VMware虚拟机Centos7新增硬盘挂载磁盘扩容分区/dev/mapper/centos-root
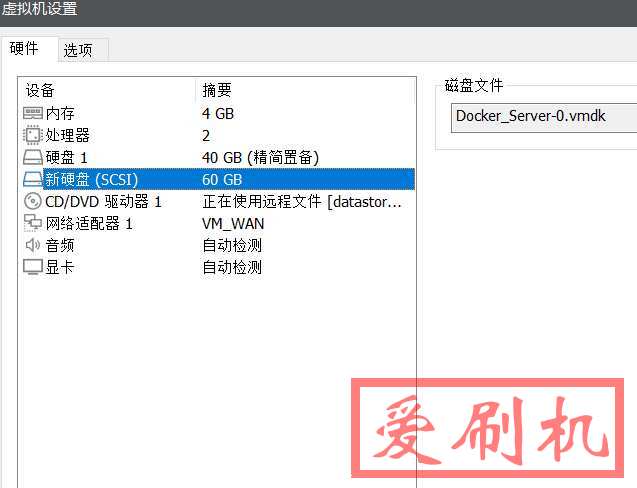
一、添加硬盘
1、关机VMware Workstation Pro虚拟机新增硬盘后开机

2、重启虚拟机后,使用
lsblk
命令查看磁盘情况
发现已经成功添加新硬盘 sdb
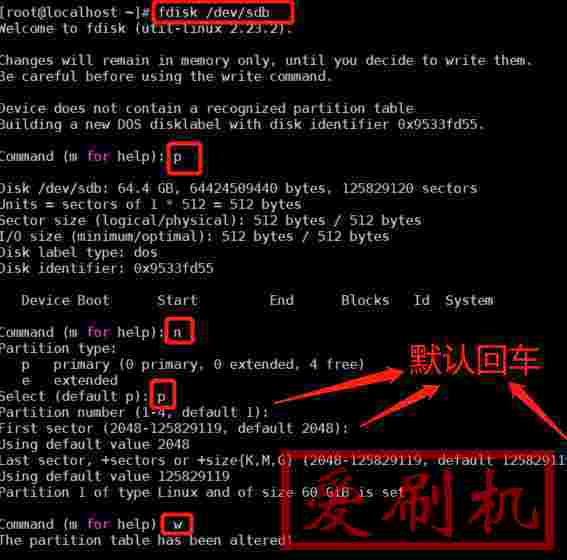
3、使用 fdisk /dev/sdb 命令创建新分区
[root@localhost ~]# fdisk /dev/sdb
Welcome to fdisk (util-linux 2.23.2).

Changes will remain in memory only, until you decide to write them.
Be careful before using the write command.

Device does not contain a recognized partition table
Building a new DOS disklabel with disk identifier 0x9533fd55.

Command (m for help):

磁盘分区完成
二、使用 mkfs.ext4 命令进行格式化
1、先使用 lsblk 命令查看分区表
[root@localhost ~]# lsblk
NAME            MAJ:MIN RM  SIZE RO TYPE MOUNTPOINT
sda               8:0    0   40G  0 disk
├─sda1            8:1    0    1G  0 part /boot
└─sda2            8:2    0   39G  0 part
  ├─centos-root 253:0    0   37G  0 lvm  /
  └─centos-swap 253:1    0    2G  0 lvm  [SWAP]
sdb               8:16   0   60G  0 disk
└─sdb1            8:17   0   60G  0 part
sr0              11:0    1  973M  0 rom
2、发现新分区是 sdb1(我只分了一个主分区,所以是 sdb1。)然后我们对 sdb1 使用
mkfs.ext4 /dev/sdb1
命令进行格式化
[root@localhost ~]# mkfs.ext4 /dev/sdb1
mke2fs 1.42.9 (28-Dec-2013)
Discarding device blocks: done
Filesystem label=
OS type: Linux
Block size=4096 (log=2)
Fragment size=4096 (log=2)
Stride=0 blocks, Stripe width=0 blocks
3932160 inodes, 15728384 blocks
786419 blocks (5.00%) reserved for the super user
First data block=0
Maximum filesystem blocks=2164260864
480 block groups
32768 blocks per group, 32768 fragments per group
8192 inodes per group
Superblock backups stored on blocks:
        32768, 98304, 163840, 229376, 294912, 819200, 884736, 1605632, 2654208,
        4096000, 7962624, 11239424

Allocating group tables: done
Writing inode tables: done
Creating journal (32768 blocks): done
Writing superblocks and filesystem accounting information: done
至此格式化完成
三、挂载磁盘到某个目录
1、我以挂载到根分区的 data 目录为例:新建 /data 目录,挂载分区到 /data 目录 (mount 临时挂载,关机失效)
[root@localhost ~]# mkdir data

[root@localhost ~]# mkdir /data

[root@localhost ~]# mount /dev/sdb1 /data
2、查看磁盘使用情况
[root@localhost ~]# df -h
Filesystem               Size  Used Avail Use% Mounted on
devtmpfs                 1.9G     0  1.9G   0% /dev
tmpfs                    1.9G     0  1.9G   0% /dev/shm
tmpfs                    1.9G   12M  1.9G   1% /run
tmpfs                    1.9G     0  1.9G   0% /sys/fs/cgroup
/dev/mapper/centos-root   37G  4.9G   33G  14% /
/dev/sda1               1014M  194M  821M  20% /boot
overlay                   37G  4.9G   33G  14% /var/lib/docker/overlay2/9856e4fb9e727eee69b32053f8f5f0d23b9fd137a4ab7f5a1e26cde0c5473605/merged
overlay                   37G  4.9G   33G  14% /var/lib/docker/overlay2/478f1bbc15f47cb5f43988a340b0abe8a4580ec4980e22c080081e3617721c5e/merged
overlay                   37G  4.9G   33G  14% /var/lib/docker/overlay2/026263a05440f37b8a13ec0455748b9da2b23433330139ab6e43fecafc70f103/merged
overlay                   37G  4.9G   33G  14% /var/lib/docker/overlay2/065bbf81a0e1bc7b24ad11ddbb03bae20c5aa13068fbfdde58271c5c5ae1deb5/merged
overlay                   37G  4.9G   33G  14% /var/lib/docker/overlay2/a9bd39fc34004486ee69e62bff06b04d649a137aca9a45cd32bfcee80ba5a53b/merged
tmpfs                    378M     0  378M   0% /run/user/0
/dev/sdb1                 59G   53M   56G   1% /data
[root@localhost ~]#
虚拟机挂载磁盘操作结束
3、如果需要开机自动挂载可以
vi /etc/fstab
新增一条代码使挂载永久生效
/dev/sdb1 /data xfs defaults 0 0
四、新硬盘扩容到 /dev/mapper/centos-root 根分区
扩容 /dev/mapper/centos-root,前八步相同,将第九步骤换成第十步骤就可以了
1、创建 pv (给刚刚新建的分区 /dev/sdb1)
[root@localhost ~]# pvcreate /dev/sdb1
WARNING: ext4 signature detected on /dev/sdb1 at offset 1080. Wipe it? [y/n]: y
  Wiping ext4 signature on /dev/sdb1.
  Physical volume "/dev/sdb1" successfully created.
2、把 pv 加入 vg 中,相当于扩充 vg 的大小,先使用 vgs 查看 vg 组,然后扩展 vg,使用 vgextend 命令
[root@localhost ~]# fdisk /dev/sdb
Welcome to fdisk (util-linux 2.23.2).

Changes will remain in memory only, until you decide to write them.
Be careful before using the write command.

Device does not contain a recognized partition table
Building a new DOS disklabel with disk identifier 0x9533fd55.

Command (m for help):0
3、我们成功把 vg 卷扩展了,在用 vgs 查看一下
[root@localhost ~]# fdisk /dev/sdb
Welcome to fdisk (util-linux 2.23.2).

Changes will remain in memory only, until you decide to write them.
Be careful before using the write command.

Device does not contain a recognized partition table
Building a new DOS disklabel with disk identifier 0x9533fd55.

Command (m for help):1
4、扩展 lv,使用 lvextend 命令,查看 lv 大小,df -h 发现 centos-root 空间没有变化
[root@localhost ~]# fdisk /dev/sdb
Welcome to fdisk (util-linux 2.23.2).

Changes will remain in memory only, until you decide to write them.
Be careful before using the write command.

Device does not contain a recognized partition table
Building a new DOS disklabel with disk identifier 0x9533fd55.

Command (m for help):2
5、那么我们要使用命令使系统重新读取大小,再使用 df -h 查看
[root@localhost ~]# fdisk /dev/sdb
Welcome to fdisk (util-linux 2.23.2).

Changes will remain in memory only, until you decide to write them.
Be careful before using the write command.

Device does not contain a recognized partition table
Building a new DOS disklabel with disk identifier 0x9533fd55.

Command (m for help):3
到这里我们就成功扩展了
Centos7磁盘挂载/扩容分区 /dev/mapper/centos-root
相关推荐
VMware虚拟机Ubuntu系统安装解包padavan固件修改工具下载,padavan固件解包打包工具使用教程
VMware虚拟机专用免安装系统下载!VMware中文极限精简优化免安装绿色版下载
VMware Workstation各个版本的注册码VMware Workstation 16 Pro key最新版注册码
VMware、ESXi等虚拟软件的反虚拟机检测技术方法探讨,VMware、ESXi等虚拟机检测与反检测
Vmware ESXi的虚拟机网卡使用直通物理网卡PCI-SIG SR-IOV开启方法及使用心得
点击链接加入群聊四群:722808830
点击链接加入群聊三群:751529538(已满)
点击链接加入群聊二群:376877156(已满)
点击链接加入群聊一群:622891808(已满)
饿了么红包

本站附件分享,如果附件失效,可以去找找看


